An uncompromisingly versatile Gear Analyzing Software System!
Microcheck is designed and introduced by MicroGear. The system will adapt to virtually any existing double flank gear rolling tester. Windows 7 and 8 and NT compatible, this “user friendly” software system runs the entire measurement process automatically. Microcheck controls the measurement process, evaluates the gear parameters, charts all results, and then presents the results on your computer screen. After viewing the easy to read results you can either print them out for permanent hard copy reference, or save them to a data base for future reference or additional print outs.
Microcheck easily adapts to whatever gear rolling tester you may be using, regardless of make or model, allowing you to test & evaluate your gears to AGMA, DIN, or your own specific tolerances.
Highly advanced, simple to use, and extremely accurate
- Makes your instrument more precise, quicker and easier to use
- Enables your machine to run automatically with a touch of a button
- Allows you to view the results on your monitor, print them out for “hard copy” reference or stores the results in a data base
- Makes 100% testing quick, easy, and accurate
- Evaluates results to AGMA, DIN, ISO or customer tolerances
- Adapts to virtually any double flank gear roll checker regardless of make or model
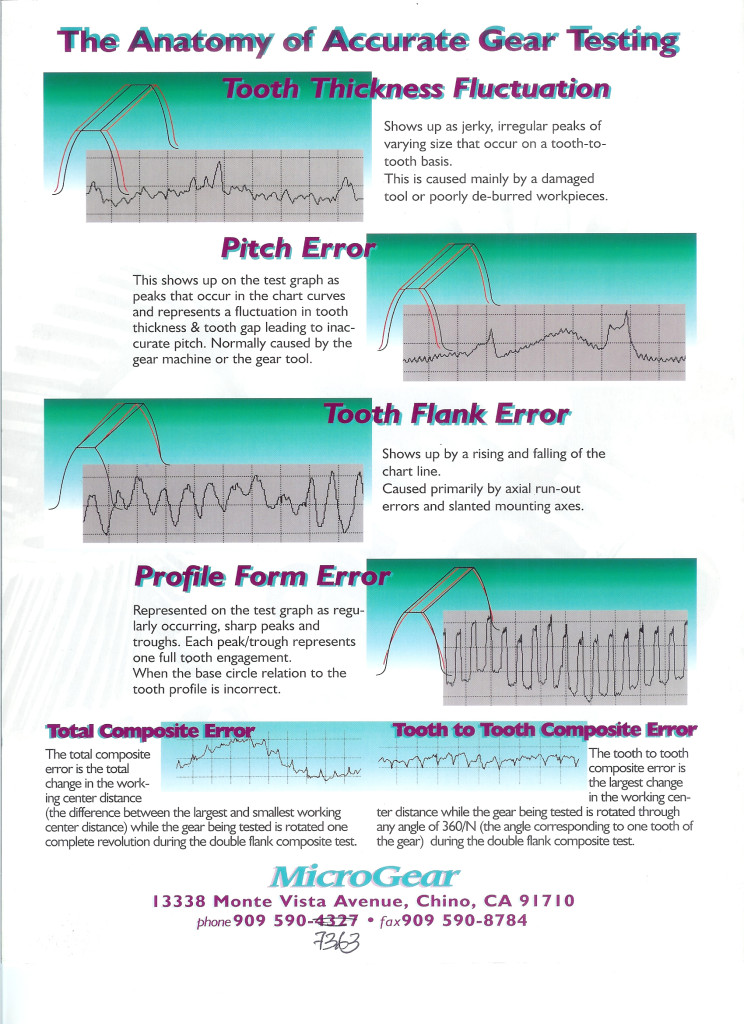
The Anatomy of Accurate Gear Testing
- Tooth Thickness Fluctuation: Shows up as jerky, irregular peaks of varying size that occur on a tooth-to-tooth basis. This is caused mainly by a damaged tool or poorly de-burred workpieces.
- Pitch Error: This shows up on the test graph as peaks that occur in the chart curves and represents a fluctuation in tooth thickness & tooth gap leading to inaccurate pitch. Normally caused by the gear machine or the gear tool.
- Tooth Flank Error: Shows up by a rising and falling of the chart line. Caused primarily by axial run-out errors and slanted mounting axes.
- Profile Form Error: Represented on the test graph as regularly occurring, sharp peaks and troughs. Each peak/trough represents one full tooth engagement. When the base circle relation to the tooth profile is incorrect.
- Total Composite Error: The total composite error is the total change in the working center distance (the difference between the largest and smallest working center distance) while the gear being tested is rotated one complete revolution during the double flank composite test.
- Tooth to Tooth Composite Error: The tooth to tooth composite error is the largest change in the working center distance while the gear being tested is rotated through any angle of 360/N (the angle corresponding to one tooth of the gear) during the double flank composite test.


